Showing posts with label recipe. Show all posts

3/9/10

hibernation - baking & breaking bread

what is it about winter that just makes us want to stuff our cheeks with food and curl up in bed for a few weeks? particularly the stuff our cheeks part. fortunately, hopefully, the end is nigh (of winter that is).

during the crazy february snowstorm, some friends and i went on a baking frenzy and made a bunch of different breads and pizzas from jim lahey's bread book "my bread". you may remember lahey from when he was featured on mark bittman's blog some years back, where he sort of messed with everyone's past notions of breadmaking (mine, for sure).
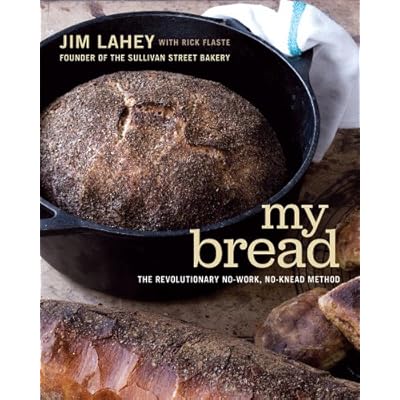

lahey says, let the bread do the work, not the breadmaker. his innovative no-knead method uses just a bit of yeast and no-kneading (obviously), letting the bread sit 12-16 (up to 18!) hours overnight, then a quick shaping and another few hours to rest, an hour in the oven and voila. best loaf of bread EVER. some of you may be saying, "but i don't have time to make bread and wait for it to rise, boo hoo". the beauty of this method is that you're asleep for the majority of the "work". and sleeping while working, well don't we all sneak naps at our desk jobs anyway?


after a few trials of the standard "no-knead bread" (recipe here) using a variety of different flour combinations and resting times, we went for a nice alternative. OLIVE LOAF!!! who doesn't love a goodwarm crispy chewy olive studded loaf of bread, fresh out of the oven?

at first glance, this recipe might look LONG and complicated. it's actually just 6 easy steps, the author is just a bit verbose, but that's to ensure that your loaf comes out looking (and tasting) stellar. so don't shy away! throw this together before bed tonight and you'll be glad you did.

Pane all'Olive (Olive Bread)
Yield: One 10-inch round loaf; 1 1/2 pounds
Equipment: A 4 1/2- to 5 1/2-quart heavy pot

Ingredients:
3 cups bread flour
about 1 and 1/2 cups roughly chopped pitted olives
3/4 teaspoon instant active dry yeast
1 and 1/2 cups cool (55 to 65 degrees F) water
wheat bran or additional flour for dusting

1. In a medium bowl, stir together the flour, olives and yeast. Add the water and, using a wooden spoon or your hand, mix until you have a wet, sticky dough, about 30 seconds. Cover the bowl and let sit at room temperature until the surface is dotted with bubbles and the dough is more than doubled in size, 12 to 18 hours.

2. When the first rise is complete, generously dust a work surface with flour. Use a bowl scraper or rubber spatula to scrape the dough out of the bowl in one piece. Using lightly floured hands, lift the edges of the dough in toward the center. Nudge and tuck in the edges of the dough to make it round.

3. Place a tea towel on your work surface and generously dust it with wheat bran or (we used) flour. Gently place the dough on the towel, seam side down. If the dough is tacky, dust the top lightly with wheat bran or flour. Fold the ends of the tea towel loosely over the dough to cover it and place it in a warm, draft-free spot to rise for 1 to 2 hours. The dough is ready when it is almost doubled. If you gently poke it with your finger, it should hold the impression. If it springs back, let it rise for another 15 minutes.

4. Half an hour before the end of the second rise, preheat the oven to 475 degrees F, with a rack in the lower third, and place a covered 4 1/2- to 5 1/2-quart heavy pot in the center of the rack. (Make sure your lid is oven safe!)

5. Using pot holders, carefully remove the preheated pot from the oven and uncover it. Unfold the tea towel and quickly but gently invert the dough into the pot, seam side up. (Use caution! the pot will be very hot.) Cover the pot and bake for 30 minutes.

6. Remove the lid and continue baking until the bread is a deep chestnut color but not burnt, 15 to 30 minutes. Use a heatproof spatula or pot holders to gently lift the bread out of the pot and place it on a rack to cool thoroughly.

11/18/09

carrots roasting over an enclosed oven flame

have i mentioned how much i love fall? i think i may have, multiple times. the kind of cool, crisp evenings where i want to invite a friend over for dinner, make a cocktail(s) and then sit on the couch and talk till midnight. where i know it's not yet 28 degrees outside, and i could go out if i wanted to, but i'd much rather cozy up with a bowl of soup i just discovered the recipe for and have it be delicious and then make a mental note to make that soup all the time through the cold season.


roasted carrot coconut soup
from la dolce vegan by sarah kramer

5-6 large carrots, diced
1 medium onion, chopped
2 garlic cloves, minced
1 inch fresh ginger, grated
1 stick fresh lemongrass (tough outer layers removed), chopped (use bottom 6 inches only)
1/2 teaspoon garam masala (see recipe below)
1/2 teaspoon ground coriander seeds
2 tablespoon olive oil
1 cup vegetable stock
1 14 oz. can coconut milk
1 tablespoon lime juice
1/4 cup cilantro
1/2 teaspoon salt
1/4 teaspoon black pepper

preheat oven to 400f. in a medium baking dish combine carrots, onions, garlic, ginger, lemongrass, garam masala, coriander and oil until well coated. bake 35-40 minutes or until carrots are tender. just before veggies are done, in a medium soup pot bring stock to a boil. reduce head and add the roasted veggies. simmer for 2-3 minutes. add the coconut milk and blend with an immersion blender until smooth (you can also just blend half the soup and leave the other half chunky for a chunkier soup rather than a smooth soup). stir in lime juice, cilantro, salt and pepper and gently reheat. makes 2 large or 4 small servings.

garam masala
1 tbsp cumin seeds
1 tbsp coriander seeds
1 tbsp black peppercorns
1 tsp ground cardamom
1/4 tsp ground cinnamon
1/8 tsp ground cloves
1/8 tsp ground nutmeg

in a dry frying pan over medium-high head, shake the cumin and coriander seeds continually for 3 or 4 minutes until seeds start to pop and brown. remove from head and let cool. place in a coffee grinder or mortar and pestle with peppercorns, cardamom, cinnamon, cloves and nutmeg and grind until smooth. makes about 1/4 cup.

love,
lauren

11/17/09

honey i squashed the salad

squash usually signifies fall cooking to me. i mean, sure, there's a whole category of "summer squash" but really, zucchini is just something that tastes good on the grill (zucchini, baby, i didn't mean it, i love you). but oh, the bounty of fall, the family of "winter squash", these truly warm my heart and my belly in a time when i need it most.

kicking off the fall squash-ables is this delectable roasted pumpkin salad sent to me by my culinary confidante mary. this recipe reminds me of her cooking that i miss so much, i knew i had to make it asap. pumpkin (or squash) and shallots (or onions) are roasted until squishy and caramelized, then tossed with wild rice and a cilantro-sunflower seed dressing. pretty darn simple when all you really do is prep the veggies and then roast 'em for 45 minutes and the rice takes 45 minutes too! in the last few minutes you throw the dressing together in the food processor, mix everything up and eat! dinner in under and hour, and leg work comes in at under 15 minutes. enjoy!


Roasted Pumpkin Salad
adapted from 101 Cookbooks

3 cups butternut (or any winter) squash, peeled and cut into 1-inch cubes
extra-virgin olive oil
kosher salt

12 small shallots, peeled
2 cups cooked wild rice*

1/3 cup pumpkin (or sunflower) seeds
1/3 cup olive oil
2 tablespoons lemon juice
1/4 teaspoon salt
1 tablespoon honey
2 tablespoons warm water
1/2 cup cilantro, finely chopped

Preheat oven to 375. Toss the squash with olive oil and salt and put on a baking sheet. Do the same with the shallots and put those on a separate baking sheet. Roast for 45 minutes, giving them a good shake every 15 minutes or so to evenly roast. Everything should be nice and soft and caramelized by the time it's done.

Now get your wild rice going, because it takes about 45 minutes too! Rinse 1 1/2 cups of the wild rice. Bring the rice and 4 1/2 cups salted water to a boil. Reduce to a simmer. Cook for 40 minutes or until rice is tender and splitting open, stirring occasionally. This makes a little extra, but you'll find something else to put it in!

Now that the rice is simmering and the veggies are roasting, you have about 30 minutes to do whatever. Go watch the simpsons, but make sure to give everything a stir during the commercial breaks. With about 5 minutes left on everything, get going on the dressing. With a hand blender or food processor puree the pumpkin seeds, olive oil, lemon juice, salt, and honey until creamy. You'll probably want to add a few tablespoons of warm water to thin the dressing a bit. Stir in the cilantro, saving a little for garnish. Taste and adjust for salt.

In a large bowl, toss the wild rice with a large dollop of the dressing. Gently toss the squash and onions into the rice. Finish with another drizzle of dressing and any remaining chopped cilantro. Enjoy the taste of fall.

11/2/09

brussels, the vegetable you thought you hated (but you were so wrong)


oh mark bittman, you irreverent, witty and genius bald man, you've done it again. you've posted a superbly simple and delicious recipe that is so easily veganizable we knew we had to get on it asap.

in a recent autumnal recipe posted under "the minimalist" column, bittman praises the little sphere everyone loves to hate: brussels sprouts. when emma and i were little, boiled brussels sprouts were the typical "I WILL NOT EAT THIS" side dish and a forceful threat of no dessert had us hesistantly biting in to the boiled, soggy balls of green. fortunately, somewhere around 17 or 18 i discovered roasted brussels and quickly thereafter, sauteed brussels and a new love was born. gone were the days of cutting into a soggy sprout and having hot water squirt in your eye. au revoir to the threat of no dessert, because i definitely cleaned my plate if a crisp, golden sprout was upon it.

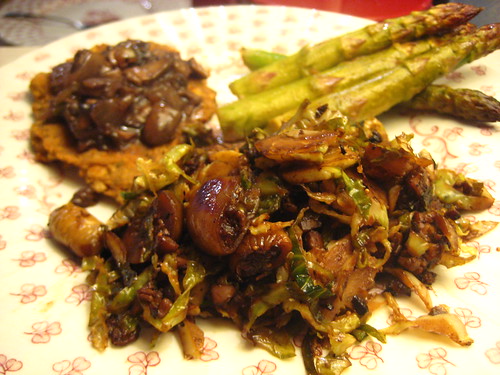
as the name of the column, "the minimalist", suggests, this recipe is simple, no frills and no fuss but allllll flavor. the ingredients are scant: brussels, bacon (we opted for tempeh bacon, thank you very much), figs, salt and pepper and a splash of balsamic. that's only six ingredients, dudes! and s&p barely count! this is how it went down:

brussels sprouts with bacon and figs
adapted from mark bittman

2 T olive oil
1 recipe of tempeh bacon
1 lb brussels
1 cup dried figs, stemmed and quartered
salt and fresh ground pepper
2 teaspoons balsamic vinegar, or more to taste

prepare tempeh bacon according to the recipe linked above. set aside in a bowl and try not to eat it all before everything else is ready (this is the hardest part of the recipe).

slice brussels into thin discs by hand, or with the slicing attachment of the food processor, if you're so fortunate to own one. heat the olive oil in a pan over medium flame. add sprouts, figs and 1/4 cup water, sprinkle liberally with salt and pepper and let that baby go for about 10 minutes until sprouts and figs are tender. crank the heat to medium high and stir for 5-10 minutes until the water evaporates. add the tempeh bacon (if there's any left at this point!) and give everything a nice stir. when thoroughly heated through, add balsamic vinegar and serve immediately.

then marvel at how much you love brussels sprouts.


we served ours with a side of roasted asparagus and chickpea cutlets (from isa's veganomicon) with a wine mushroom sauce. YUM!

love,
lauren

10/27/09

1st cake of the fall


the silver lining to all of this chilly rain and gray skies (so relentless sometimes, you can feel the raindrops pelting against your very bones), is that it's finally time to turn the oven back on! the first few weeks of fall still prove to be too pleasant and breezy to have an appliance in the kitchen emitting hundreds of degrees of radiant heat. but now...now is just the perfect time to put on a jazz LP, all fuzzed out against the record player's needle, to make a late afternoon french press, and to dig up old baking recipes banished to the back of the pile.

our first cake of the fall was a truly collaborative effort. lauren whipped the cake up in minutes flat, and i improvised on the filling and the glaze. chocolate, cinnamon, apples, cinnamon, cider and rum - can you think of a dessert flavor profile more fitting for autumn?

Choco Cinnamon Cake w/ Apple Rum Filling & Black Pepper Cider Glaze
takes about 45 mins, 25 inactive
makes 2 round cakes, 2 cups of filling and 1/2 cup glaze
cake recipe adapted from Eat, Drink & Be Vegan by Dreena Burton

ingredients for the cake:

2 cups +1-2 tablespoons all purpose flour
1/2 cup regular cocoa (not dutch processed)
1 tsp baking powder
1 1/2 tsp baking soda
1 1/8 cups sugar
1/2 tsp salt (scant)
2-2 1/2 tsp cinnamon
1/4 tsp nutmeg
1 3/4 cup water
1/8 cup balsamic vinegar
1 1/2 tsp vanilla extract
1/4 cup canola oil

ingredients for apple filling:

1 teaspoon vegan margarine
2 medium to large crisp apples, such as gala, sliced thinly
2 scant tablespoons brown sugar
2 big splashes dark rum or brandy

ingredients for cider glaze:

1 cup of apple cider
pinch of cinnamon
3 black peppercorns

- preheat the oven to 350 degrees F.

- combine all the dry ingredients: sift the flour, cocoa, baking powder, baking soda, spices and salt, and then stir in the sugar.

- combine all the wet ingredients.

- add the wet to dry and mix until just incorporated.

- pour the batter into two round pans, lined with parchment paper. pop 'em in the oven and set a timer for 23-25 minutes.

- while the cake is baking, make the filling: put the margarine into a cast iron pan over low to medium heat, and let it melt. add the apples and stir gently until they're softened and slightly browning, about 6 minutes. slightly turn up the flame, and add the brown sugar. let it get melt-y over the apples, maybe 2 minutes. turn the heat up even higher and add the liquor. it should sizzle loudly and caramelize onto the apples. stir gently and taste a piece of apple. does it taste awesome? if so, its done, so turn the heat off. cover the pan and let the apples sit in their stew til you're ready to fill the cake. if the apples do not taste awesome, add a bit more sugar and let it cook for another few minutes.

- the cakes should be done by right around this time. test with a toothpick or knife for done-ness. put them on a rack (still in the pan) to cool.

- put the cider in a non-stick sauce pan over a high flame; bring it to a boil. turn the flame down, add the cinnamon and black peppercorns, and let the cider reduce until it's about 1/2 a cup. it should be syrupy and glaze-y. if it sits for awhile before the cakes fully cool and thickens up too much, you can re-heat and thin it out with a bit of water or more cider. make sure to fish out the peppercorns!

- when the cakes have cooled enough to safely touch the pan, gently wiggle them out of the pan.

- unlike using frosting, you don't have to wait for the cakes to fully cool before adding the extras.
so set one cake on a plate, and spread the apple filling out across the top, making sure to save a few pieces for a garnish. put the 2nd cake on top, and press down very gently. then pour the cider glaze on top, and garnish with a few slices of the apple you saved. serve immediately. this cake will be good for up to 4 days if you keep it in a cake saver!


love,
emily

10/25/09

quick & ease - sweet pot salad


it's a great feeling when you can tell that a new recipe is gonna be a lifelong keeper, before the food is even finished. that's exactly how i felt when rocking mark bittman's sweet potato salad, as posted on his most righteous blog bitten, in the new york times (sigh). even though bittman sure loves his meats and fishes, this spicy little salad came out of the box 100% vegan, so all i had to do is cook. using a recipe for a simple salad may seem a bit silly, but as our friend halimah put it, "they just always turn out better when you do." the secret, i think, is all in the dressing. if left to my own devices, i most likely would have over complicated it, adding extra spices or whatever that would muck it up. this one is simple as anything - just some jalapeno, garlic, lime juice, olive oil and salt. absolutely gorgeous, and adds such a lightness to the decadent roasted sweet potatoes. the completed salad is a lovely, vibrant mix of colors and textures, and takes maybe 10 minutes to make (not including the time the potatoes are in the oven). one addition that i think could be nice for a heartier dish would be some roasted crimini or baby bella mushrooms. but it's pretty perfect on its own, too...

sweet potato salad
adapted from bitten by mark bittman

see the original post here
takes about 50 minutes, 40 minutes inactive
makes a big bowl full

4 medium sweet potatoes, peeled and cut into chunks
a few tsps + 1/4 cup of olive oil
1 red onion, chopped or sliced
2 tablespoons fresh jalapeno pepper, minced
1-2 cloves of garlic, peeled
juice of 2 limes
2 cups of cooked black beans
1 red pepper, diced
handfull of cilantro
salt & pepper

- preheat the oven to 400 degrees F.

- toss the sweet potato and onions in a few teaspoons of olive oil, salt and pepper. lay it out on a pan, and roast in the oven for 30-40 minutes, or until the sweet potatoes and tender and brown around the edges.

- while the taters are cooking, chop the peppers and drain the beans.

- put the jalapenos, garlic, lime juice and 1/4 cup olive oil into the food processor. blend until smooth. taste for salt and pepper.

- when the potatoes & onions are done, toss them in a bowl with the red pepper, black beans, and the spicy dressing. sprinkle with a healthy dose of cilantro. done!


love,
emily

5/20/09

Milli Vanilla

this is key here, watch my lips and listen to the pre-recorded vocals: buying vanilla extract is a total waste of money. i'm not looking down on you for doing it, i'm just trying to show you the light.


sure, i've bought my fair share of vanilla extract, and i'll be honest, i usually go for the imitation shit because it's cheaper and i'm cheaper. i once saw a bottle of organic vanilla extract on the shelf of whole foods for $10.99 and literally gasped. with the price of vanilla extract so high AND maple syrup reaching cosmic outer space high prices (higher than sky-high, mind you) this baker had to figure something out, FAST.

enter scene: a pouch of vacuum sealed grade-A tahitian vanilla beans i bought for sister emma somewhere between two and four christmases ago, as part of a gourmet gift basket, the ingredients of which i assembled myself (we've been foodies for awhile, just not so publically recorded). some minimal internet research indicated the ease of which vanilla extract can be made at home. this recipe will last for months if you're an avid baker like myself, longer if you're less inclined to make all those sweet treats at home.

note: DO NOT buy your vanilla beans in a grocery store. they cost something like $8.99 for four beans and they're all dried out and shriveled. that's bull. buy them online and it will be worth it. i got twenty beans for $12.99 (granted, that was years ago but a quick e-bay search proved that we're still working it somewhere in that price range).

vanilla extract
2 cups (or about 500 milliliters) vodka
5-7 vanilla beans

(it's not really an exact science as you're basically soaking some vanilla beans in some booze. but that's about the ratio you want to work with.)


split the beans down the center and then cut them in half or thirds, so as the liquid level drops (as you use it!) the beans stay submerged. place beans in a glass container with a tight-fitting or cork lid. some people like to use brown or green glass bottles (see: grolsch) to keep their extract safe from the sun, but i prefer a clear glass bottle so i can see my progress. just store that sucker in a dark place and it'll be fine. top your beans off with your booze, cap and stick it on a dark shelf in the back of your pantry (do you have a pantry? lucky.). you won't be using this 'nilla for about 6-8 weeks. every couple of days, pop in to say hi and give your bottle a little shake. i don't know if this is necessary but it makes me feel like i have a little pet, as sadly, we have no real pets (i am aware this statement is pathetic).

once your extract has a nice amber color it's ready to go! leave the beans in there so your extract will continue to develop in flavor as you use it. once it's about halfway used up, just top it off with vodka like you would your favorite cocktail and keep on bakin! THIS COULD POTENTIALLY LAST YEARS, so they say. once your extract no longer turns amber, it's time to replace the beanies.

one big happy family!

xoxo
lauren

2/4/09

Peanut Butter Cookie Time

i've been shacked up in bed with a little bit of a fever and a little bit of an infection for two straight days and you can only watch so many episodes of 30 Rock before you feel the need to do something even slightly productive. so i cleaned my room, changed my bed sheets, applied for a few jobs and to top it all off i thought, well why don't i go ahead and bake something.

it's no longer a secret to everyone that i love sweets. tonight, after a hearty meal of leftover pasta with lentils courtesy of sister emma, i had a little craving for something warm and dessert-like. i immediately remembered the new addition of some oats to our kitchen and furiously rustled through the pages of a September '08 copy of vegetarian times that touted "homemade vegan cookies & brownies" on the cover. ahhh yes, peanut butter-oatmeal cookies, i've been waiting to make you. here they are on the cooling rack, note the big old pieces of oats, that makes them "healthy", people.

i guess these being healthy and all, i can eat 3 right off the cooling rack. the hard thing about doing a food photo shoot, besides my lack of photography skills, is that when a hot meal is in front of you, you just want to dig in! but when a whole 2 dozen cookies are in front of you, it's hard to stop digging in. did i mention i love peanut butter?

if you missed the recipe link above, here it is again. they were pretty easy to make, with tony as my co-baker, we banged these out in about 10 minutes. the problem is they are SO good, SO bite sized and SO adorable that this triple threat makes it really difficult to stop yourself from eating 5.

2/1/09

let them eat pancakes

Oh pancakes, is there nothing you can't do? Why, just the other day, a batch of leftover pancakes thoroughly cleaned the bathroom! And last week, when I wasn't feeling well, pancakes went in to work for me so I could stay home and rest. Normally though, pancakes fill my belly with simple, easy, delicious sustenance.

Once in a great while (ok, more like a few times a month) it seems as though our kitchen has been ransacked. Wha happen to all the tofu, tempeh, beans, vegetables, snausages, fruit, bread and yogurt (and everything else there is to eat)!??

That's when I refer to a tried and true 5 ingredient pancake recipe. FIVE INGREDIENTS! It doesn't get much easier (that is, unless you use a boxed mix, but let's not even go there, shall we?). This recipe is super simple and adaptable. I like to make little individually flavored pancakes - chocolate chip, apple cinnamon (see lower right hand corner of picture below), banana walnut, coconut almond, whatever! Top with bananas, maple syrup, jam, peanut butter or raw honey and revel in the wonders of easiness, cheapness and yum. Yeah, it might not be the most nutritious thing out there, but there's worse, oh god there's so much worse.


Classic Pancakes (from How It All Vegan)
2 cups flour
1 tsp baking soda
1 tsp baking powder
2 cups soy milk
2 tbsp oil

The best way to make pancakes is with a hot non-stick pan, a plastic spatula, and a lid to cover them while they cook, which hastens the cooking process and ensures that the middle won't end up gooey! Heat your oven to about 200F and place a heat-resistant plate inside. As you finish making your pancakes, transfer them to the oven so that they'll stay warm until you are ready to serve them.

In a large bowl, sift the flour, baking soda and baking powder together. Add the milk and oil and mix together carefully until "just mixed" (if you mix too vigorously the pancakes won't get fluffy!). Portion out about 3/4 to 1 cup of batter onto a hot non-stick pan or lightly oiled frying pan and cover with a lid. Let sit on medium heat until the center starts to bubble and becomes sturdy. Flip pancake over and cook other side until golden brown. Repeat until all the batter is gone. Makes 2 or more servings. Enjoy!

1/14/09

Cait's Muffin Mania!


A few years ago I met a darling little vegan lady at a house show. How did I know she was darling and vegan? She brought muffins (or were they cupcakes? or cookies?) to the show for all to snack on. Vegan snacks are practically my middle name so I knew I had to meet her.

This was back when I was but a novice vegan and it was then that Cait suggested I check out "How It All Vegan" by Sarah Kramer. Since then I have amassed so many more cookbooks, and pretty much every time I get a new one, I tell Cait about it, just in case it slipped under her radar and I can return the favor.

Since Cait moved from Allentown, PA to Athens, OH I don't run into her as much and the vegan chatter has ebbed. However, I recently stumbled upon her new blog, Cait-a-Day. The concept is genius, really, as she's taken the wonders of The Artclash Collective's Fun-a-Day and is attempting to apply it to every month of the year. January is her first month, and she's making a different batch of vegan muffins every day and posting the recipes and pictures! My two favorites are Perky Peanut Butter Pretzel (pictured) and Pants Party Peanut Butter (it's not a coincidence that both have peanut butter in them). I can't wait to try those and lots of others!

Check out Cait's blog (but keep reading ours too!). Next month she's going to dance for 30 minutes every day! This probably won't be as deliciously rewarding for her friends, but it still sounds rad as hell....

P.S. If you live in the Philadelphia area, you can check out the Fun-a-Day art show on February 14th at Studio 34 Yoga in West Philly! This is me encouraging you to go.

1/3/09

cookies they smudge


Last week I attended what was supposed to be a small, homey get together. The anti-rager, I kept calling it, the kind of party where the "partying" consists of sitting around cozily and lazily, listening to records, wearing sweaters, drinking vegan-nog, recapping your holiday gifts (regiving your unwanted gifts, perhaps?) and, yes, eating cookies, some vegan, others, not so much:


It was still the holidays back then, and I suppose it is now, because I certainly am still eating cookies. Unlike my sister's fancy day-tracker, I know the time of year by the telltale culinaria (winter = baking, summer = juicing, autumn/spring = salads!). Suffice to say, the party soon dropped the anti and was just a rager, but never fear, the cookies still were eaten and compliments were heartily passed around.

So as to arrive fashionably and foodily late, I decide to whip up a batch of Sparkled Ginger Cookies from Vegan with a Vengeance before heading over, one of my favorite cookbooks and a simple, tried and true recipe at that. I was extra excited to make this recipe because Em and I each received Silpats for Christmas, something I've been wanting for a long time, but was never really sure if I wanted to drop $25 at Foster's on just one item. Silpats are amazing because they transform our shoddy, kinda busted cookie trays into non-stick producers of moist, chewy and golden victuals. Unfortunately, due to my desire to get every last dish done in the 10-12 minutes the cookies were to bake, I didn't really check or rotate the trays as I should have, and a whole dozen burned to little flat pancakes of sadness. However, the two trays on the top tier of the oven must have had a bit more moxy, as they turned out reasonably well and definitely edible. See:


Later, at the party, I was lamenting the loss of those poor dead cookies and how much it sucks to throw any food away, especially something you just got done making. A nice lady told me that with the Silpat, you should reduce your baking time, or at the very least, check in on your goods about 5 minutes before the recipe says to. So, now I'll have to try again, and again, and again and maybe again after that. Just because the holiday season is winding down doesn't mean i can't continue to enjoy cookies! Cookies for all I say! Moist, delicious, well baked cookies for all!

Sparkled Ginger Cookies
makes 2 dozen cookies

4 tablespoons turbinado or demerrara sugar (regular sugar works well but coarse is best and most sparkly)
2 cups all purpose flour
1 teaspoon baking soda
1/4 teaspoon salt
2 1/2 teaspoons ground ginger
1/2 teaspoon ground cinnamon
1/2 teaspoon ground cloves
1/2 cup canola oil
1/4 cup molasses
1/4 cup soy milk
1 cup sugar
1 teaspoon vanilla extract

Preheat oven to 350 degrees. Lightly grease two cookie sheets. Place the turbinado sugar in a small bowl. Sift together the flour, baking soda, salt, and spices. In a separate large mixing bowl, mix together the oil, molasses, soy milk, sugar, and vanilla. Pour the dry ingredients into the wet and combine well. Roll into 1-inch balls, flatten into a 1 1/2-inch-diameter disk, press the cookie tops into the turbinado sugar and place 1 inch apart sugar side up on a prepared cookie sheet. Bake 10-12 minutes, let cool on cookie sheets for 3 to 5 minutes then transfer to a cooling rack.

Followers